
I used bass wood to build my bookcase and measured the width of the space I had from the door molding to the wall, which was 5 inches. I cut my back piece 4 inches wide (this allowed for the 1/8 inch sides and the half inch molding at the top) by 6 inches tall. Then I cut two side pieces 1 inch by 6 inches.

I glued the sides to the back with white glue and let it dry.

Then I cut two pieces - one for the top and one for the bottom - 1 inch by 4 1/4 inches to allow them to overlap the side pieces and glued them in place.


For the top, I cut a piece 4 1/4 inches wide by 1 inch. With a pencil, I marked either side at 1 inch and then used a paint can set on the pencil marks to mark the rounded portion, cut it out and glued it in place.

I used 1/2 inch balsa wood to make the molding at the bottom of the bookcase, cut it to size and glued it in place.

I refined this next step when I had to rebuild the bookcase again because on the first try, I didn't account for the half inch molding so it ended up being to wide. On my second bookcase, I just cut one piece the width and height I needed, which was 4 1/4 by 2 inches, and glued it in place over the sides. In this photo I had cut four extra pieces, one for the top and three for the sides and middle. On my second try I realized this was just extra work because it was going to be covered with the doors anyway. I guess at some point I decided they would be non-opening doors. If you want your doors to open, then you'd do it the way shown in the photo below.

The next step is to cut a piece that will act as the top of the cabinets below and the first shelf on the bookcase. This piece is 4 1/2 inches wide by 1 1/4 deep. I cut it so that the shelf would slide in and create a bit of an overhang on the sides and front. This cut is about 1/8 of an inch which accounts for the sides and allows the shelf to slide in. I glued the back, cut out sides and the top of the cabinet below. Be sure to adjust the shelf so that it sits flat and level. You may have to hold it in place for a bit and allow the glue to dry. You could also glue a small piece to the back to allow the shelf to sit on that for extra strength.

I then cut two pieces 2 inches by 2 inches and glued them to the bottom to create cabinet doors.

I cut two more pieces approximately 1 3/4 inches by 1 3/4 inches and glued them to the front of the doors to create some interest. I then cut my crown molding to length allowing for a 45 degree angle on the left side where the two pieces line up on the front and side and glued them in place. I left off crown molding on the right side to allow the bookcase to fit snugly up to the wall on that side. I then cut two shelves about 4 inches wide by 7/8 inch deep to allow the shelves to sit in slightly from the front, glued them back and sides and set them in place. It might be handy to have books and other items you plan on placing on the shelves to adjust the height of your shelves.

I then stained the bookcase with Red Mahogany stain and used varnish to seal it. I will be adding some more detailed trim on the front doors of the "faux" cabinet doors and some handles when I find ones I like.

And voila`!


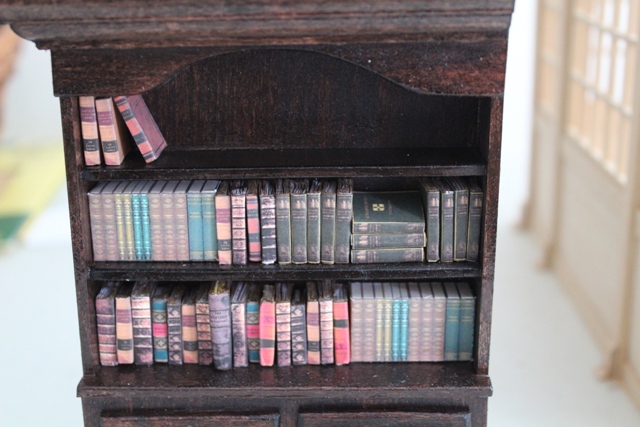
Books are purchased from Little Things of Interest on Etsy.
Hello Teresa Marie,
ReplyDeleteFantastic work. The bookcase looks amazing and I am a sucker for a custom built in piece. The crown molding is perfect and the finish is lovely.
Big hug
Giac
Thank you Giac! I'm enjoying building my own furniture for the manor.
DeleteHugs,
Teresa
Well Done Teresa!!!
ReplyDeleteI admire how you've fearlessly charged forward and met your bookcase challenge and finished it with Terrific results!
Thank you Elizabeth! There are still a few things I'd do differently, but it works for now. That's the fun of building your own . . . you can always improve upon something! LOL!
DeleteHugs,
Teresa
Thank you Teresa Marie for that tutorial. The photos made it easy to follow. Basswood is so nice to work with and takes paint and stain so well.
ReplyDeleteYou are certainly making progress.
Regards Janine
Thank you Janine! Yes, I like basswood for those reasons and now with my new saw it'll be even easier!
DeleteHugs,
Teresa