Monday, December 31, 2018

Happy New Year

Have a happy and safe New Year everyone!  May the blessings of the last year carry forward and anything that no longer serves you be left behind.

My New Year's Resolutions

  • Be more joyful.
  • Smile and laugh more.
  • Bless my body every day, just the way it is.
  • Do one house project per month (we have twelve rooms so that will span the year!).
  • Plant a hosta garden.
  • Cook at least two meals per week (hubby does most of the cooking for which I am most grateful).
  • Find something to be grateful for every day.
  • Meditate for 15 minutes every day (preferably in the warm sunshine).
  • Thank hubby for at least one thing every day.
  • Celebrate July 4th with friends as we become American citizens!


Shingling the Turret

My husband, the puzzle enthusiast, is awesome at putting things together.  Since he did such an awesome job on my last house, I asked him if he'd pretty please do the shingles on the manor.  Being the awesome guy he is, he agreed to do it.

After I stained and painted each shingle (a good time to do some meditation) and an almost full day of work on hubby's part, this is what he has done so far.  I love that rosette!

the left side
see the rosette?
the back
He'll be working on the turret today and will likely get it finished.  Then it's on to the main roof!  I hope his bill isn't going to break the Pennethorne bank!

Friday, December 28, 2018

Every Builder Knows . . .

Every dollhouse builder knows that in between the construction and decorating decisions, it's nice to buy something for the house that provides inspiration, motivation and well let's face it . . . everyone loves to shop!

I'm still dreaming and scheming on how the kitchen is going to come together.  Working on and completing the kitchen is a ways down the road, but I couldn't resist this when I saw it on Mollysue Miniatures website . . .


Photo Credit Mollysue Miniatures

Wednesday, December 26, 2018

Catching Up

Hello everyone!  Are you still there?  (There seems to be a problem with my computer . . . I can't see you!).  Ha!  I've been busy around the big house and farm.  We spent a good deal of time getting ready for winter and I caught the "clean and decorate my big house" bug.  There had been several projects that have been sadly neglected and I was in the autumn mood of fixing and cleaning.  We got several items marked off the list with still more pending and of course, more added on.

We decided to take some time off around Christmas to relax and enjoy our favorite pursuits.  Mine of course, is working on my dollhouse.  I picked up where I left off working on the ceiling.  It took several hours of brain power, but I finally came up with a plan!


Merry Christmas

I'm a little slow on the uptake, but I did want to extend warm wishes and the very merriest of Christmases to you.  By now you've probably eaten about as much turkey as you can stand and are ready for the relatives to pile back into their sleighs and ride off into the sunset.  Take heart . . . at least the sun sets earlier this time of year!


Blessings,
Teresa

Monday, November 12, 2018

Dancing on the Ceiling

I'm imagining a coffered ceiling in the dining room of Pennethorne Manor.  As usual, the manor is speaking to me and she says she wants one.  Like this . . .


HA!  Dream on sister!  In reality, it will probably end up looking something like this . . .


Or this . . .


I just love making more work for myself (she says with a sarcastic tone).  But when I get something in my head I can't let it go.  Now to figure out how to accomplish such a monumental task . . .

Friday, November 9, 2018

Floor Score and . . .

Yesterday I got the dining room wallpapered and it was no easy task.  The wallpaper was "wafer" thin and very delicate to work with.  The finish scraped off if I wasn't careful.  Because the walls in the dining room were so rough I elected to paste the wallpaper to poster board and then apply it to the walls.  I'll never install windows before papering again!  It was a nightmare to get the paper around the windows and trim, but somehow I managed to get it done without it looking too much like a horrible mess.


Wednesday, November 7, 2018

Keep on Keepin' On

Progress has been slow, but steady, on the manor.  Most of the trim is painted, except for the top trim around the mansard roof.  I have dedicated Friday as a "house day", so I'm hoping to get the trim painted and the shingles stained so Brian can shingle the roof on the weekend.  Fingers crossed!  The clapboard siding has arrived, so that will be painted as well and then installed.

I was all set to wallpaper the dining room, but decided that the wallpaper wasn't vibrant enough, so I ordered something different.  I'm much happier with the new paper.  It's a gorgeous red with gold peacocks.

New paper on top of old . . .


Monday, October 15, 2018

Slow and Steady Progress

My mom has been visiting from Canada so I've been sneaking in an hour here or there to work on the manor.  After the weekend with my friend Tracy, who did most of the electrical for me, I managed to install a few more lights and replaced the simple bedroom light with a three armed chandelier.

Electrical wires soldered to tape wire and labelled . . .


Sunday, September 30, 2018

Let There be Light

I had a wonderful weekend with my dear friend Tracy who came up to install lights in the manor.  She is a true light master!  I learned a lot and feel confident enough to move forward installing the rest of the lights and the chandeliers when they arrive.

We only encountered a few hiccups which were easily resolved.  I am in awe of how detailed Tracy does her wiring . . . look at this.  Braided wires!  How pretty is that?


Tracy hard at work . . .


Wednesday, September 26, 2018

Window Woes

So I completed the bay windows only to discover that I painted them wrong!  After looking longingly at my inspiration picture, I realized I didn't paint the exterior window sashes in the right color.  Only the inner exterior trim.  Whaaaaa . . . .  I gently pried the windows apart and repainted them in the gold they should have been painted in the first place.  Satisfied that I got it right, I set about gluing and reinserting them.  Then I discovered another faux paus!  I painted the interior sashes cream instead of staining them!  Sigh . . . I feel defeated.  My only recourse now is to paint them as close to the stain color as I can.  As a sometime perfectionist, this irks me, but I'll have to live with it.  Needless to say, I was much more careful with the remaining windows.


I'm loving this little breakfast room addition!
Yesterday, I sanded, painted and stained the double bedroom window, the third floor hall window and the two dining room windows.  They turned out well, but I noticed this morning that one of the dining room windows is crooked.  EEEgads!!  I tried to pry it off, but I glued it on so well it isn't budging and rather than create a real mess, I decided to leave well enough alone.  This window will be covered by the screened porch, so I'm hoping it won't detract from the overall appearance of the manor.


However, if I loose sleep over it tonight, it might be coming off anyway . . .  Question:  Why is it that when you dry fit everything fits perfectly, and then when you glue it things turn out wonky?  Enquiring minds want to know!

I also cut out the opening for a single French door from the bedroom to the deck over the breakfast room.  I had originally ordered a full glass door, but then I thought "why'd I do that?" when clearly it should be a single French door!  Ah well, all's well that end's well.

I centered the door over the breakfast room's bay windows.  I had to pull out hubby's big saw to cut through the plywood and then finished the little bits with my utility knife.


Then I found a piece of scrap wood to fill in the space left by the original window opening.  And voila!  An opening for a French door (to be installed upon arrival).

I'm working on the ceilings now getting ready for lighting this weekend when my friend arrives to help me out.  I'm not only looking forward to lighting the manor, but spending time with my friend whom I haven't seen in several years.  It will be fun catching up!

Staying Inspired

Sometimes when you're in the middle of a build and things aren't going right, it's easy to throw in the towel and move on to something less frustrating.  It's at those times I really appreciate the people and blogs out there in miniature land that keep me inspired and motivated to keep going.  These are just a few that really stand out for me.  For a full list, visit my sidebar.

Elizabeth's Studio E - her miniature scenes are to die for.  She has left no detail untouched and her rooms look like they're right out of the pages of a design magazine.  She also has a sense of humor so it's fun to read her blog posts.  She shares her miniature trials and tribulations which give you the motivation to keep moving forward.  I could sit and read her blog for hours while enjoying the beautiful pictures she shares.

Morning Room Villa Leone ~ Photo Credit Elizabeth's Studio E
Giac's Late Victorian English Manor - Giac's manor is i-n-c-r-e-d-i-b-l-e!  He has built most of his manor by hand!  The manor is absolutely stunning with the rooms having the most incredible detail.  When you read some of his posts you'll appreciate that Giac must have the patience of a saint.  His warm personality shines through in all of his posts.  You'll need a cup of tea with you (and don't forget to raise your pinky finger!).

The Countess's Study ~ Photo Credit Giac's Late Victorian English Manor
Jodi's My Miniature Madness - Jodi's Storybook Cottage will transport you into a well-loved fairytale.  From wallpaper to stucco, there's a delight around every corner.  Jodi shows you her progress in beautiful pictures and tutorials.  She's currently working on a cottage garden making gorgeous flowers of all kinds.  She makes me want to stop building and start gardening!

Storybook Cottage ~ Photo Credit Jodi's My Miniature Madness
I hope you'll visit these wonderful blogs and peek into their miniature worlds.  And don't forget to leave a comment . . . we love and appreciate comments!

Hugs,
Teresa

Saturday, September 22, 2018

Chim chiminey, chim chim cher-ee

Chim chiminey, chim chiminey, chim chim cher-ee
A sweep is as lucky as lucky can be
Chim chiminey, chim chiminey, chim chim cher-oo
Good luck will rub off when I shakes 'ands with you
Or blow me a kiss
And that's lucky too

Now as the ladder of life as been strung
You may think a sweep's on the bottommost rung
Though I spends me time in the ashes and smoke
In this 'ole wide world there's no 'appier bloke

Chim chiminey, chim chiminey, chim chim cher-ee
A sweep is as lucky as lucky can be
Chim chiminey, chim chiminey, chim chim cher-oo
Good luck will rub off when I shakes 'ands with you

Chim chiminey, chim chiminey, chim chim cher-ee
A sweep is as lucky as lucky can be
Chim chiminey, chim chiminey, chim chim cher-oo
Good luck will rub off when I shakes 'ands with you

I choose me bristles with pride
Yes, I do
A broom for the shaft and a brush for the flume

Up where the smoke is all billered and curled
'Tween pavement and stars is the chimney sweep world
When the's 'ardly no day
Nor 'ardly no night
There's things 'alf in shadow
And 'alf way in light
On the roof tops of London
Cool, what a sight

Chim chiminey, chim chiminey, chim chim cher-ee
When you're with a sweep, you're in glad company
No where is there are more 'appier crew
Than them wot sings, chim chim cher-ee, chim cher-oo
Chim chiminey, chim chim
Cher-ee chim cher-oo

I didn't realize this song was so long!  Did you?  I started singing it today whilst working on the manor chimney.  I'm starting to lose my mind.  I have over 20 hours invested in this little chimney!  I was almost at the finish line when I noticed that the top two sides were crooked and the spaces were so large you could fit a small elephant between them!  That will teach me for applying bricks from the front and while the house sat on the floor.

Today, I put the manor on a table and turned it so I was facing the sides.  Needless to say, I got a much better result.  I've applied the paint and will let that dry before applying matte Mod Podge to seal the egg carton bricks and then apply the grout once that's dry.  This method of brick laying is not for the faint of heart!

That being said I still have the foundation to do and Brian thinks I should brick the balcony coming off the bedroom.  That will definitely be for another day!

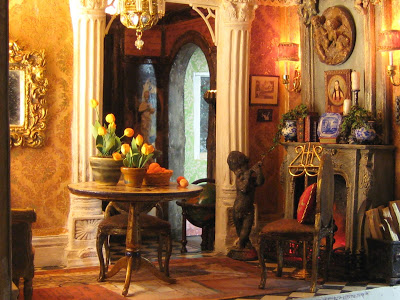
So here she is in all her glory . . . mostly.  I still have those finishing things to do.


I'd like to send a shout out to Brae at otterine's miniatures for her awesome brick tutorial!  Thanks Brae!

Thursday, September 20, 2018

Let There be Light

The light fixtures for the manor arrived yesterday.  Most of them came, but some of them are on backorder.  Sigh . . .  I hate it when that happens.  At least we'll still be able to move forward with the lighting.  My friend, Tracy, is coming next weekend to help me out.  I'm attempting round wire and Tracy is an expert having built many, many houses.

I ordered my supplies from Oakridge Hobbies.  They had the best selection and best prices.


Front entry light . . .


There are two sets of French doors on the exterior.  One at the front and one at the breakfast room.  I'll also need to order another exterior light for the door that will lead to the deck from the bedroom (it sits on top of the breakfast room).


These are the ceiling lights for the wine cellar, butler's pantry, sewing room, bathroom, second floor hall, bedroom, Reg's room, third floor hall, study, and attic.


There will be four sconces on either side of bureaus in the two upper halls.


Two sets of these lights for the kitchen.


Lights for the breakfast room.


Over the next week I'll be installing the ceiling paper.  I bought anaglypta paper with a textured pattern.  I see most people flip their houses over to paper the ceilings, so I might give that a try.  Although I feel kind of woozy just thinking about it!

I'm hoping to finish the chimney today and will post about that later today or tomorrow depending how far along I get.

Tuesday, September 18, 2018

Rooms with Views

In the morning the sun comes in through an east kitchen window streaming sunlight onto Pennethorne Manor.  It's a magical time of day . . .


I've been plodding away at the manor in what seems like endless trim work.  I finally got all the trim on the house and got the bay window sashes and trim painted and installed.  In real life, I'd rather be a builder than a carpenter.  Give me the big guns!


I had to install extra trim at the corners of the bays where the middle window meets the side windows because there was about a 1/4 of an inch dead space.  This is one of those serendipitous moments where a fuddle becomes a welcome detail.  Once the trim was glued on, I set about painting everything with cream paint.  I painted the inner part of the exterior trim with gold paint.  I painted the undersides of the top trim cream and will be painting the end and top with the garnet paint.  I'm thinking there's a little too much white, but when the siding goes on with the green I selected it shouldn't stand out quite so much.

I finally finished the main hall flooring and after two coats of super gloss Mod Podge, I set it in place.  It looks pretty nice!  I'll set it in permanently once the wiring is done.


I'm still trying to decide how to finish the foundation.  Brick or stone?  I'm thinking brick because that's how I want to finish the fire place.

Next order of business . . . painting more trim, completing the fireplace and installing the dining room windows.

Saturday, September 15, 2018

Debating with Myself

I'm debating whether to put a door in the master bedroom with access to a balcony above the breakfast room.  What do you think?  If so, do you think it should be centered on the bay window?