

Wednesday, January 30, 2019
A Victorian High Tea
I couldn't wait any longer . . . I had to set up my new tea set from Victoria Fasken. I also added the chocolate confections I believe I purchased from Kim Saulter at Kimsminibakery on Etsy. She's currently working on a Victorian High Tea at the manor for six. I'm looking forward to bringing it all together!

Building a Bird Stand (Tutorial)
Today I built a bird stand for my lovely miniature cockatoo from Hannah Hawkins on Etsy. Her work is amazing! I hope the stand does the bird justice!
I started with a 1/4 inch dowel. I cut the pole at 3 inches and the cross piece at 1.5 inches. I drilled a hole in the middle of the cross piece and a hole in the middle of one end of the pole.


I started with a 1/4 inch dowel. I cut the pole at 3 inches and the cross piece at 1.5 inches. I drilled a hole in the middle of the cross piece and a hole in the middle of one end of the pole.


Tuesday, January 29, 2019
Mini Making Me
After finishing the dining room furniture I decided to complete the kits I purchased from Kris at 1 inch minis - Estate Chair. Her directions were well written and it was easy enough to put the chair together, although I did manage to get glue in places where glue shouldn't be. I guess that's my trademark . . . sigh . . .


Saturday, January 26, 2019
Poofy Chair Seat Tutorial
If you're like me, you like your chairs to have poofy seats rather than those flat topped pancakes that pose for cushions you get when you purchase a chair. Here is a short tutorial on how I "poof" my chair seats. I'm sure there are other ways of doing it, but this works for me.
I'm making new cushions here, but you can gently pull off the seat from any chair to make it poofier (don't you love that word?!).
To begin you'll need some fabric cut in the shape of your chair seat. I'm using burgundy velvet here. You'll need half of a jumbo cotton ball, and some heavy cardboard for the base of the seat (if you're covering a new chair - you can just cover over your existing chair seat). Scissors and a glue gun.

Dining Room Suite
Yesterday I finished the dining room suite. It went together fairly well, except for the breakfront upper doors. They were a pain. Every time I tried to install them with the pins, they'd break apart. Grrr . . . I managed to get it all together, however, and I'm pleased with the results. Except for the stain. It's rather disappointing. I purchased Minwax Red Mahogany, but honestly it looks just like the dark walnut I've been using. I like darker furniture so it's not a total bust, but I was looking for the mahogany color of Chippendale furniture. Oh well . . . I'll just have to say it's American Chippendale, as they used various other woods other than mahogany.
The other disappointing feature is that when I pulled off the plastic protecting the "glass" inserts, it left marks. I guess because the kit was so old it had settled somewhat. I'm hoping a little bit of "Goof Off" will work. Do you have any other suggestions?
On the whole I enjoyed building my own furniture. I still have two more chairs to build and upholster, so I had better. Not to mention the kitchen . . .


Wednesday, January 23, 2019
House of Miniatures
The interior of the manor is finished. Let me say that again . . . the interior is finished! Save for a few pieces of crown molding in the 2nd floor hall and adding trim around the parlor bay window. I saw how Mike Guidry had done it in his Beacon Hill and decided I liked it. So I'm going to do it.
Since the interior is complete I decided to pull out my House of Miniatures kits yesterday. I've been procrastinating on getting these done because I thought they'd be difficult. To my delight and surprise, they weren't difficult at all! I guess because a couple of the boxes weren't sealed, I was worried that pieces were missing, but my worry was misplaced. All the pieces were there. Big sigh of relief . . .
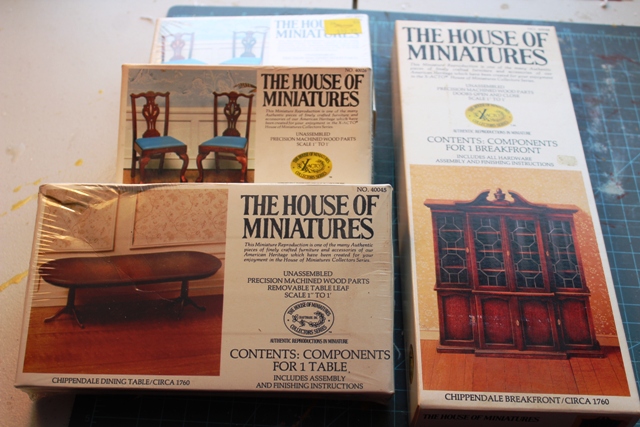
I purchased all Chippendale furniture (story to follow in another post). I started with the dining room table. It went together without too much effort. I just couldn't figure out how to place the blocks on the side aprons, but once I figured that out, I was done. And I had to re-glue the tops to the under carriage and place them under some heavy books because the tops had lifted off. Disaster averted.


Since the interior is complete I decided to pull out my House of Miniatures kits yesterday. I've been procrastinating on getting these done because I thought they'd be difficult. To my delight and surprise, they weren't difficult at all! I guess because a couple of the boxes weren't sealed, I was worried that pieces were missing, but my worry was misplaced. All the pieces were there. Big sigh of relief . . .

 |
| Table ends and table leaf. |

 |
| Underneath shows the sliding mechanism. |
Call me crazy, but this picture makes me laugh hysterically. It looks like a flattened chicken. Disclaimer: No chickens were harmed in the making of this table.
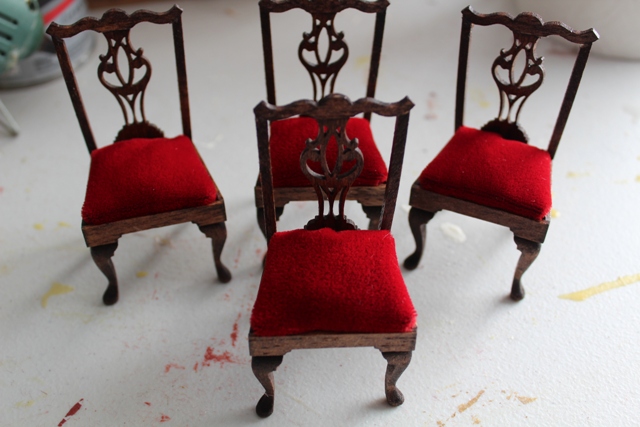
Next I built the chairs. I was going to just do a pair and call it a night, but I got addicted. I have that type of personality . . .
 |
| I used push pins to hold the back in place over the alignment diagram. |


Oh my gosh I love miniature furniture! Isn't it the cutest? And I have to say that building my own comes with a great sense of satisfaction and accomplishment.
Next I decided to "just" open up the breakfront box and check to make sure all the pieces were there. Well, one thing led to another and . . .

Today I'm going to finish building the breakfront and then I'll seal, stain and varnish everything, along with making the cushions for the chairs. And just because I like to play . . .


Monday, January 21, 2019
Dollhouse Mash Up
Here are a few odds and ends that I've finished up over the last week . . .
I've decided that instead of Reginauld's bedroom, that little space at the top of the stairs on the third floor is going to be the family chapel. I purchased this sweet little kit from Arjen at ArjenSpinhovenMinat on Etsy. I'm going to try and stain it, but if that doesn't work I'll paint it. There were no directions with the kit, but it went together fairly easily. A little bit of glue at each joint held it together beautifully.


I finally was able to permanently install the Jacqueline chandelier from JGetzan Miniatures in the dining room. It's beautiful! I could just sit and look at the chandeliers in the main floor rooms all night. The crystals twinkle in the soft light and it's mezmerizing!


Since the chandelier was installed in the dining room, I was able to finish the bathroom floor and finish all the trim.


I pondered what to do on the flat roof tops of the manor and decided on going with sandpaper. I'd seen it somewhere and thought it was a great idea. I ordered black 60 grit black sandpaper from Amazon, cut it to size and glued it on. I like the effect. I also painted all the cranberry trim and because I had to cut the sandpaper to fit, you could see the wood in between the cuts. To hide this, I painted black on the wood at each seam. This hid the cuts beautifully.


Most of the finish trim (baseboards, crown molding, et cetera) is finished. All that's left is trim around two French doors and finishing the baseboards around them. And that will do it for the interior of the house!
All that's left on the exterior is siding, applying trim over the wiring at the back of the house, applying egg shell brick to the foundation, and shingling the mansard roof. I hope my contractor has cleared his calendar for this coming weekend!
Sunday, January 20, 2019
The Nursery
Today I finished the nursery. It's a vision in pink! I have some gorgeous pink curtains and a rug on order and am on the lookout for a canopied crib. This little room is coming together and will be a wonderful place for the little one to come . . .


Parlor Doorway


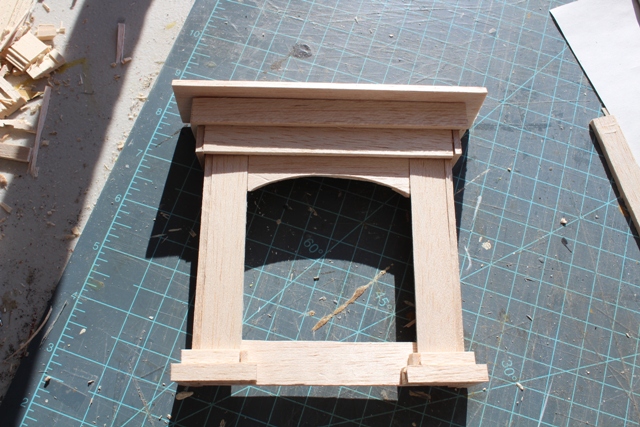
Study Fireplace Mantel
I've had it on my mind to put a mantel over the fireplace in the study. I tried several different ideas, but decided that what it really needed was a full fireplace surround. I found a great tutorial at Cinderella Moments. While I used the basic ideas of putting it together, I finished mine differently adjusting it to the fireplace already on the wall. It's not perfect, but it adds so much more to the room.


Monday, January 14, 2019
A Victorian Nursery
When I got the shell built on Pennethorne Manor and was showing Brian the rooms, he asked where the nursery was. I said there wasn't going to be a nursery. Just the other day he brought it up again and I decided that yes, I think the house needs a nursery. Putting it above the breakfast room now balances the house on the right and left sides. Brian cut the walls for me and I glued everything in place. I placed an order for wallpaper, flooring, windows, and a ceiling light. I'm looking forward to furnishing and decorating the nursery.
What once was going to be an outdoor deck/sitting area is now the nursery. I think it was serendipitous that I put in a door!


Subscribe to:
Posts (Atom)