Thursday, March 7, 2019

Ivy Leaves and Pillows

I haven't worked on the manor since the middle-end of February, rather spending my time getting my big house in order.  Spring fever has hit, although the temperatures still leave a lot to be desired.  I'm trying to organize, paint and spring clean before warm weather hits so I can spend my time outside.  I plan on spending a lot of it outside this year soaking up some much needed Vitamin D from the sun.  I also have a few projects planned that I'm looking forward to.

The manor is never far off my mind and I did spend some time shopping for the perfect chandelier for the conservatory.  Yes, I decided it needed to have a chandelier and I found just the one from JGetzan MiniaturesIt's the Rosette Chandelier in gold. Their stuff is so gorgeous it's really hard to decide, but in the end I opted for this ivy leaved chandelier.  I think it will tie in beautifully with the feel I want for the room, which is made cozy with lots of plants.


I also ordered more pillows from Mondina Dollhouse on Etsy.  I can't get enough of her exquisite designs.

For the Parlor
For the Breakfast Room
For the Little Girl's Room
I have tomorrow set aside for working on the manor so I hope I'll have more for you soon.  Have a beautiful Friday!

Thursday, February 21, 2019

The Conservatory at Pennethorne Manor

Ha!  How do you like that title?  Rather presumptuous and aristocratic isn't it?  Perfect!

I was able to get the conservatory mostly finished today.  I'm still deciding on how to attach it to the house and then finish the roof with acrylic which is on order.  My back and neck are aching from all the different positions I had to put myself in trying to fit the wallpaper.  It took most of the afternoon (with breaks), but I got it done and it turned out well . . . at least to my liking.  For the floor I decided to use walnut flooring for the step from the breakfast room to the conservatory, and used a vinyl tile from Menard's for the conservatory flooring.  It kind of looks like marble and with the rug, it's hardly noticeable.

And with that done . . . you just know I had to play!


The wicker furniture was made by a beautiful lady named Wendy (wenlaine) who I was privileged to meet on the Greenleaf forum years ago.  She also made the cross stitched rug.  Thank you Wendy!

Wednesday, February 20, 2019

Little Girl's Room

OMG!  I can hardly stand it!  The pink cotton candy sugariness of it all!  This is what a miniaturist lives for . . . that heart pumping, mind blowing moment when it all comes together and sends shivers all over the body.  Yep . . . I'm in utopia!

I talked about the gorgeous bed in a previous post.  It was custom made by Ruthellen's Dollhouse Miniatures.  And look at these curtains!  I'm not kidding when I tell you I went weak in the knees and had shivers all over my body when I opened the boxes.  These curtains are so lovely, the pictures hardly do them justice.  They were a custom order from Tanya Shevtsova on Etsy.


And here they are in the room.  Please forgive my ineptness at taking great photos.  I'm still trying to figure out my camera.


My heartfelt thanks to the lovely ladies whose art now adorns my humble manor.  And thanks also goes to my husband, whose idea it was to add a little girl's room.  I'm in awe of how well you know me!

There's one more piece I'll be adding to this room . . . but I'll save it for a surprise!

Monday, February 18, 2019

Library Bookcase Tutorial

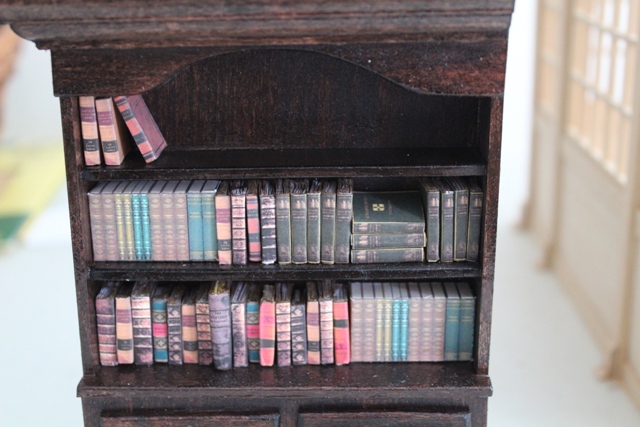
A few weeks back I built a custom bookcase for the study/library.  The two bookcases I had originally purchased didn't fit along the wall in the new manor, and as I didn't have enough room to separate them and make it look good, I opted to build one especially for the space.

I used bass wood to build my bookcase and measured the width of the space I had from the door molding to the wall, which was 5 inches.  I cut my back piece 4 inches wide (this allowed for the 1/8 inch sides and the half inch molding at the top) by 6 inches tall.  Then I cut two side pieces 1 inch by 6 inches.


 I glued the sides to the back with white glue and let it dry.


Then I cut two pieces - one for the top and one for the bottom - 1 inch by 4 1/4 inches to allow them to overlap the side pieces and glued them in place.


For the top, I cut a piece 4 1/4 inches wide by 1 inch.  With a pencil, I marked either side at 1 inch and then used a paint can set on the pencil marks to mark the rounded portion, cut it out and glued it in place.


I used 1/2 inch balsa wood to make the molding at the bottom of the bookcase, cut it to size and glued it in place.


I refined this next step when I had to rebuild the bookcase again because on the first try, I didn't account for the half inch molding so it ended up being to wide.  On my second bookcase, I just cut one piece the width and height I needed, which was 4 1/4 by 2 inches, and glued it in place over the sides.  In this photo I had cut four extra pieces, one for the top and three for the sides and middle.  On my second try I realized this was just extra work because it was going to be covered with the doors anyway.  I guess at some point I decided they would be non-opening doors.  If you want your doors to open, then you'd do it the way shown in the photo below.


The next step is to cut a piece that will act as the top of the cabinets below and the first shelf on the bookcase.  This piece is 4 1/2 inches wide by 1 1/4 deep.  I cut it so that the shelf would slide in and create a bit of an overhang on the sides and front.  This cut is about 1/8 of an inch which accounts for the sides and allows the shelf to slide in.  I glued the back, cut out sides and the top of the cabinet below.  Be sure to adjust the shelf so that it sits flat and level.  You may have to hold it in place for a bit and allow the glue to dry.  You could also glue a small piece to the back to allow the shelf to sit on that for extra strength.


I then cut two pieces 2 inches by 2 inches and glued them to the bottom to create cabinet doors.


I cut two more pieces approximately 1 3/4 inches by 1 3/4 inches and glued them to the front of the doors to create some interest.  I then cut my crown molding to length allowing for a 45 degree angle on the left side where the two pieces line up on the front and side and glued them in place.  I left off crown molding on the right side to allow the bookcase to fit snugly up to the wall on that side.  I then cut two shelves about 4 inches wide by 7/8 inch deep to allow the shelves to sit in slightly from the front, glued them back and sides and set them in place.  It might be handy to have books and other items you plan on placing on the shelves to adjust the height of your shelves.


I then stained the bookcase with Red Mahogany stain and used varnish to seal it.  I will be adding some more detailed trim on the front doors of the "faux" cabinet doors and some handles when I find ones I like.


And voila`!


Books are purchased from Little Things of Interest on Etsy.

Happy Valentine's Day


There's not much to be said about Valentine's Day around my house.  My husband doesn't believe in Hallmark holidays.  So there are no flowers and no chocolates.  No romantic dinner out.  And even though he doesn't celebrate the holiday, I did get a gift.  Something even better than flowers, chocolates or dinner.  A table saw!!  If you're a miniature DIYer, you appreciate what an awesome gift this is!

No more wrestling with a utility knife for me!  I've already put the saw to use cutting down some half inch trim for the dormer windows and cutting a sub-floor for the conservatory.  I was even able to cut the acrylic for the conservatory to size.  Yahoo!!


If you're starting out with building a dollhouse and plan on bashing, or are even contemplating building your own dollhouse from scratch, I highly suggest one of these babies.

While I was fitting and cutting the conservatory floor and decided on what to do about the dormer window trim, Brian was busy shingling the left side of the Mansard roof.  He finished it off yesterday and again, he did an awesome job.  He installed two rosettes on either side of the dormer window and they look spectacular.  Only the left side and the right side front are left to do.


And lastly, my custom order from Ruthellen's Dollhouse Miniatures came on Saturday.  She is a master at her craft.  She created a custom bed for the little girl's room which is absolutely beautiful, along with a matching bedside table.  I love it!  I found curtains on Etsy and they are at the post office ready to be picked up.  I'm loving bringing this little girl's room to life . . . now I just need the little girl!


Ruthellen created these gorgeous custom drapes for the main boudoir.  They match the bed suite that I had purchased from her back in 2009.  She also created a swag and jabot for the French door, but I had given her the wrong measurement, so she's making new ones.  My bad.  I had measured the door, but forgot to measure to include the trim.  I was just going to live with it, but dear hubby, who knows me so well, said to "get it right".  Gotta love a man like that!


Today I'll be finishing up the trim on the dormer windows, adding corbels to the porch and if my back allows, will start on the siding.  And then there's that turret at the end of the porch . . .